


Cách cài đặt Camera Ezviz trên điện thoại và PC tuy đơn giản nhưng không phải ai cũng biết cách làm. Do đó bài viết này sẽ hướng dẫn bạn cách cài đặt lại Camera Ezviz từ A tới Z cực kỳ chi tiết. Cùng tham khảo ngay các bước thực hiện trong bài viết này nhé.
Biết cách cài đặt Camera Ezviz để làm gì?
Việc biết cách cài đặt Camera Ezviz sẽ giúp bạn có thể quan sát được những khu vực bạn muốn. Từ đó giúp đảm bảo an ninh cho khu vực được giám sát.

Ngoài ra, việc biết cách cài đặt chi tiết còn giúp bạn sử dụng được hết các tính năng trên Camera Ezviz. Thay vì chỉ dùng camera để ghi hình như bình thường. Bạn sẽ có thể biết và can thiệp kịp thời những tình huống xấu nhờ xem video ghi được thông qua Camera Ezviz.
Giới thiệu về ứng dụng Camera Ezviz
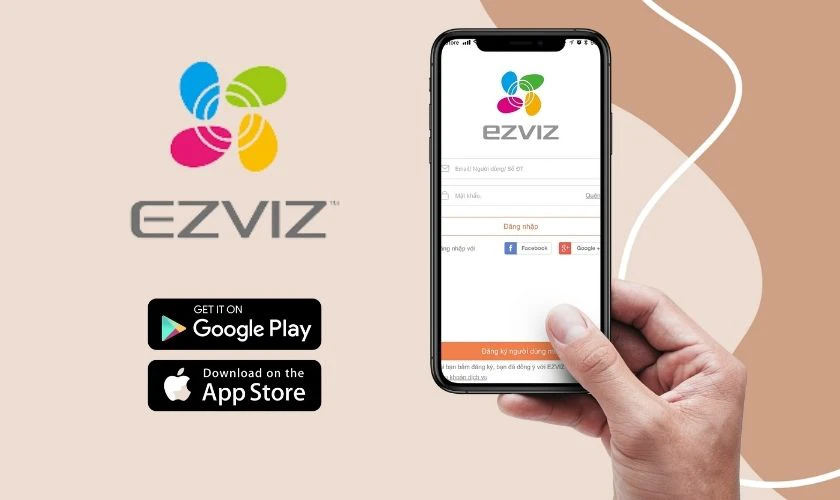
Ezviz là ứng dụng giám sát thông minh. Ứng dụng này giúp đảm bảo an tinh cho ngôi nhà hay khu vực mà người dùng mong muốn.
Thông tin ứng dụng:
- Nhà cung cấp: EZVIZ Inc.
- Nền tảng tương thích: Android 5.0 trở lên và iOS 10.0 trở lên
- Dung lượng: Android - 84.3MB; iOS - 455,6 MB.
Link tải ứng dụng:
- Android: https://play.google.com/store/apps/details?id=com.ezviz&.
- iOS: https://apps.apple.com/vn/app/ezviz/id886947564.
Với ứng dụng Ezviz, bạn có thể điều khiển camera dù ở bất kỳ đâu, bất kỳ lúc nào chỉ với một chiếc điện thoại. Dưới đây là một số tính năng nổi bật của ứng dụng này:
- Cho phép cài đặt và quản lý camera Ezviz trên điện thoại di động.
- Nhận thông báo cảnh báo khi phát hiện có điều bất thường.
- Chia sẻ camera với nhiều người.
- Dễ dàng xem lại video đã ghi hình trước đó.
Cách tạo tài khoản Camera Ezviz
Để đăng ký tài khoản trên ứng dụng Ezviz. Sau đó, bạn có thể tham khảo 2 cách đăng ký tài khoản được hướng dẫn bên dưới.
Đăng ký tài khoản bằng địa chỉ Email
Nếu chọn đăng ký bằng địa chỉ Email, bạn sẽ phải trải qua 4 bước dưới đây.
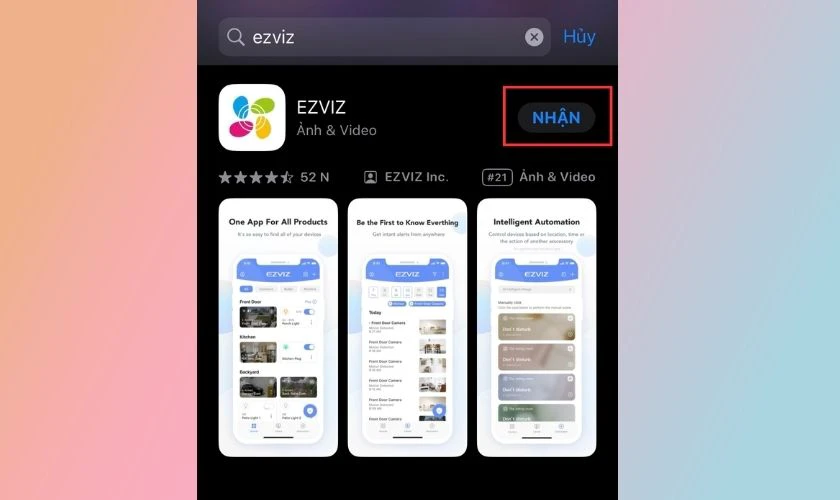
Bước 1: Bạn cần tải ứng dụng Ezviz về máy. Cách tải ứng dụng này cho điện thoại Android và iOS khá giống nhau. Đối với điện thoại iPhone. Bạn chỉ cần nhập Ezviz trên thanh tìm kiếm của App Store. Lúc này ứng dụng hiện ra và bạn bấm vào Nhận để tải ứng dụng về máy.
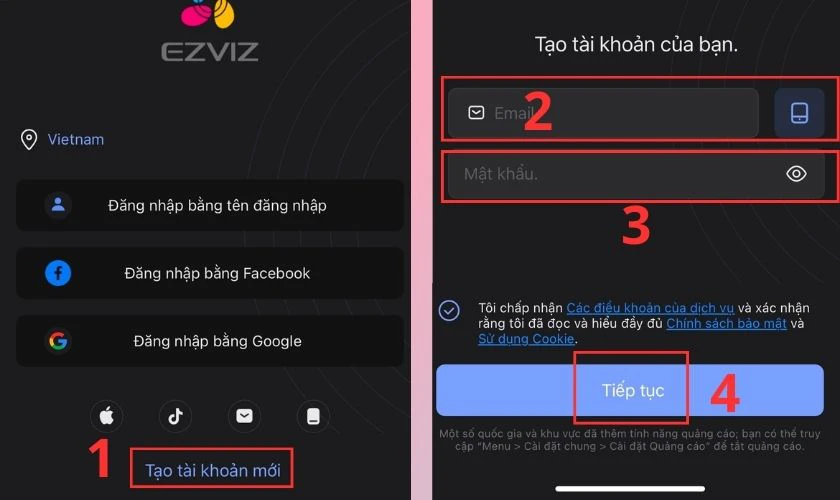
Bước 2: Khi đã tải xong ứng dụng, bạn tiến hành mở ứng dụng lên. Sau đó bạn chọn vào Tạo tài khoản mới. Bạn tiến hành điền địa chỉ Email, mật khẩu và chọn vào hình tròn để đồng ý với điều khoản của ứng dụng. Sau đó chọn Tiếp tục.
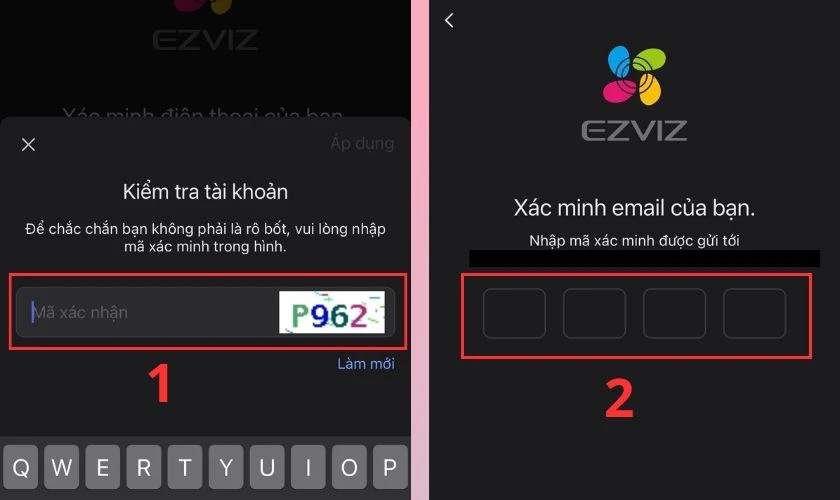
Bước 3: Kế tiếp bạn nhập mã xác minh để chắc chắn không phải là rô bốt. Sau đó, một mã xác minh khác sẽ được gửi về Email của bạn. Khi nhận được mã, bạn tiến hành nhập chính xác mã đó và ô như trong hình.
Bước 4: Bạn chọn tiếp Vào Trang chủ.
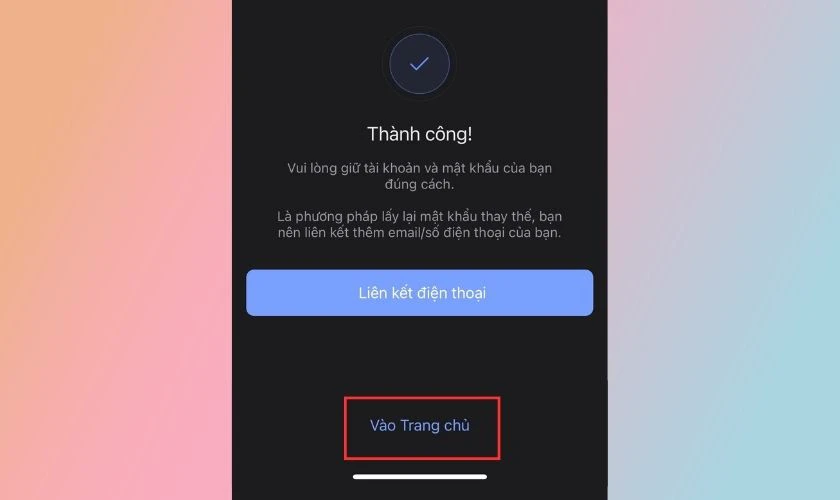
Như vậy bạn đã đăng ký thành công tài khoản Camera Ezviz bằng địa chỉ Gmail rồi đấy.
Đăng ký tài khoản Camera Ezviz bằng số điện thoại
Tương tự như đăng ký tài khoản bằng Gmail. Cách đăng ký tài khoản Camera Ezviz bằng số điện thoại cũng được thực hiện rất dễ dàng.
Bước 1: Đầu tiên bạn chọn vào Tạo tài khoản mới. Sau đó bạn chọn vào biểu tượng hình điện thoại.
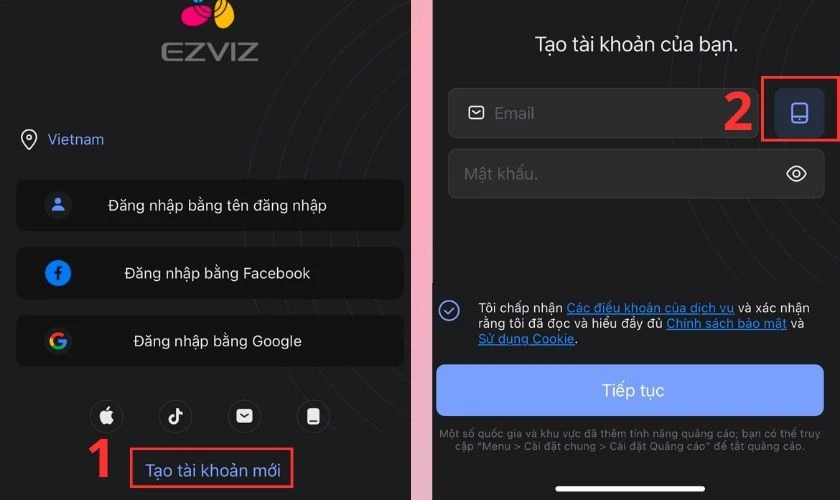
Bước 2: Bạn tiến hành điền số điện thoại, mật khẩu và chọn vào hình tròn để đồng ý với điều khoản của ứng dụng. Sau đó chọn Tiếp tục. Kế tiếp bạn nhập mã xác minh để chắc chắn không phải là rô bốt.
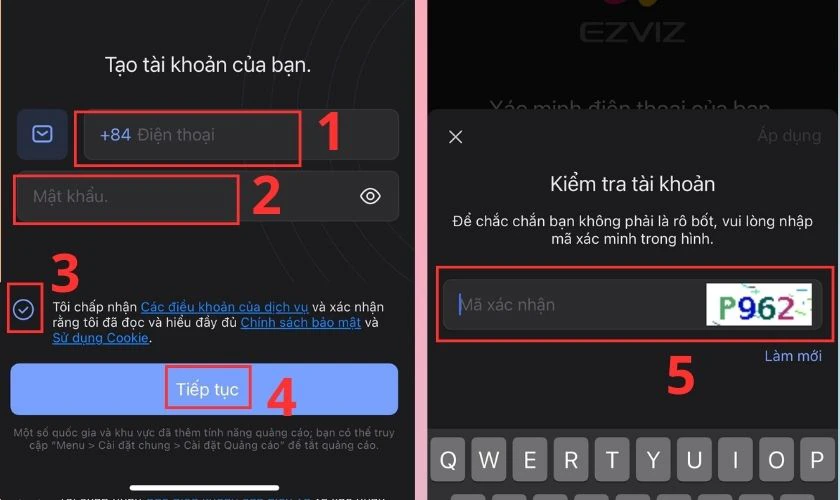
Bước 3: Sau đó một mã xác minh khác sẽ được gửi về số điện thoại của bạn. Khi nhận được mã, bạn tiến hành nhập chính xác mã đó và ô như trong hình. Sau đó bạn chọn tiếp Vào Trang chủ.
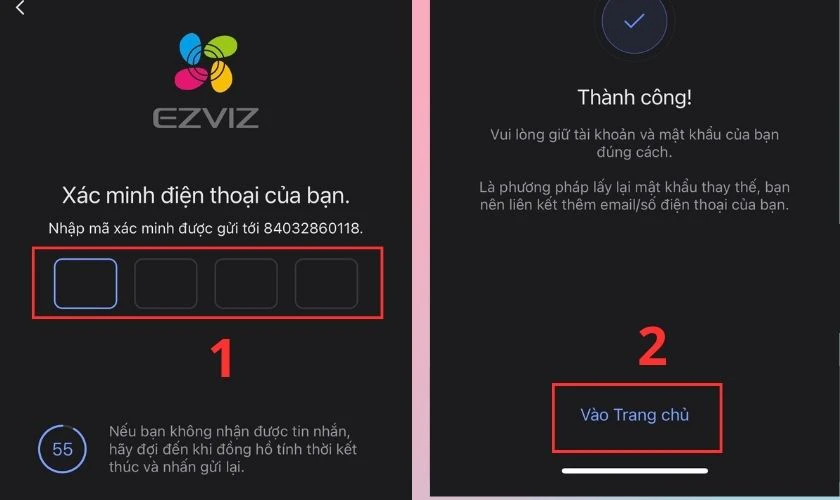
Như vậy chỉ với 3 bước bạn đã hoàn thành xong cách tạo tài khoản Camera Ezviz bằng số điện thoại rồi đấy.
Cách cài đặt kết nối camera Ezviz trên điện thoại Android & iOS
Sau khi đã đăng ký được tài khoản Camera Ezviz. Bạn hãy thực hiện 3 bước bên dưới để biết cách cài đặt camera Ezviz trên điện thoại nhé.
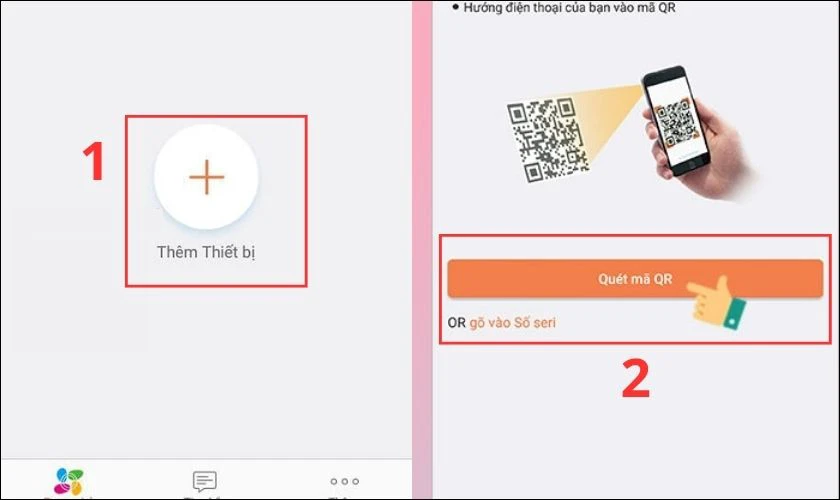
Bước 1: Đầu tiên bạn chọn Thêm thiết bị. Tiếp đến bạn chọn Quét mã QR.
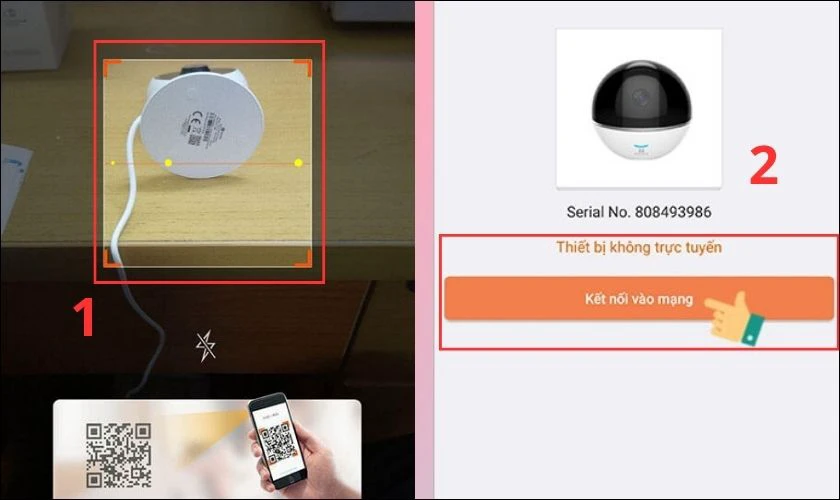
Bước 2: Đưa mã QR dưới đáy camera vào màn hình để quét mã. Khi đã kết nối thành công, bạn chọn vào Kết nối vào mạng.
Bước 3: Bạn chọn tiếp vào Kết nối không dây. Lúc này thông tin mạng không dây của camera sẽ hiện ra. Bạn nhấn vào Kế tiếp.
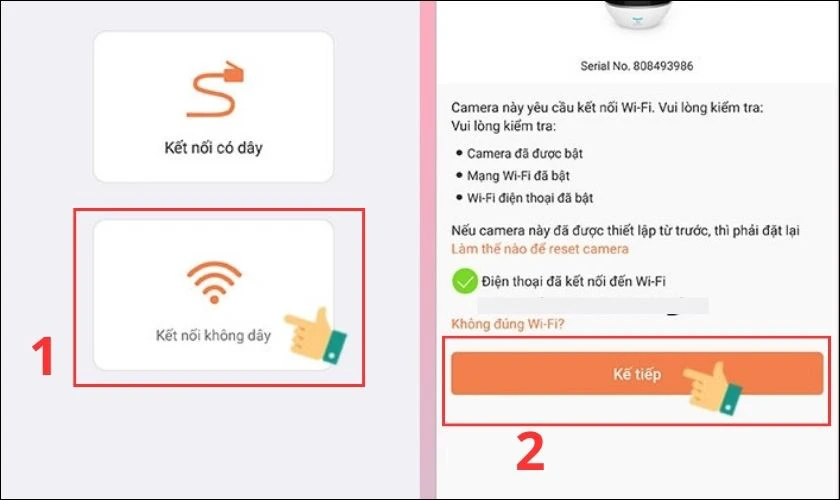
Sau đó bạn cần đặt camera và điện thoại kế bên nhau để quá trình kết nối được hoàn tất.
Cách cài đặt lại Camera Ezviz khi đổi Wi-Fi
Sau khi biết cách cài đặt Camera Ezviz trên điện thoại. Nhưng khi đổi Wi-Fi thì Camera Ezviz sẽ bị lỗi và không cập nhật được hình ảnh. Do đó bạn cần biết cách thao tác cài đặt lại camera Ezviz khi đổi Wi-Fi.
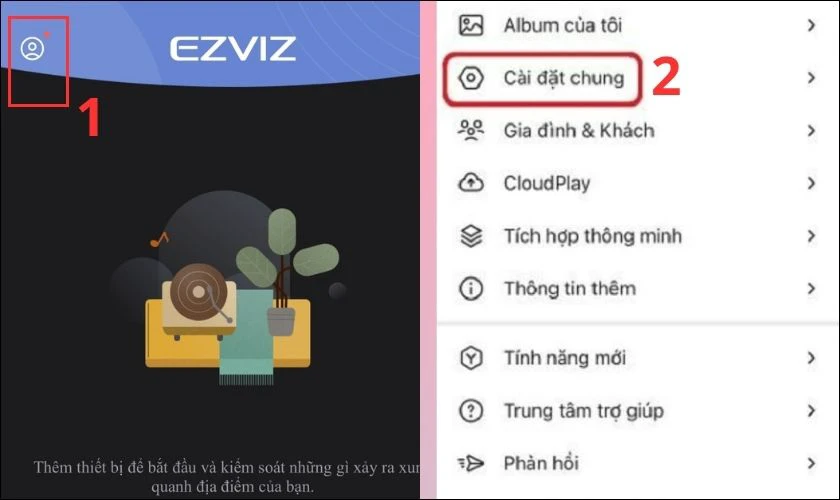
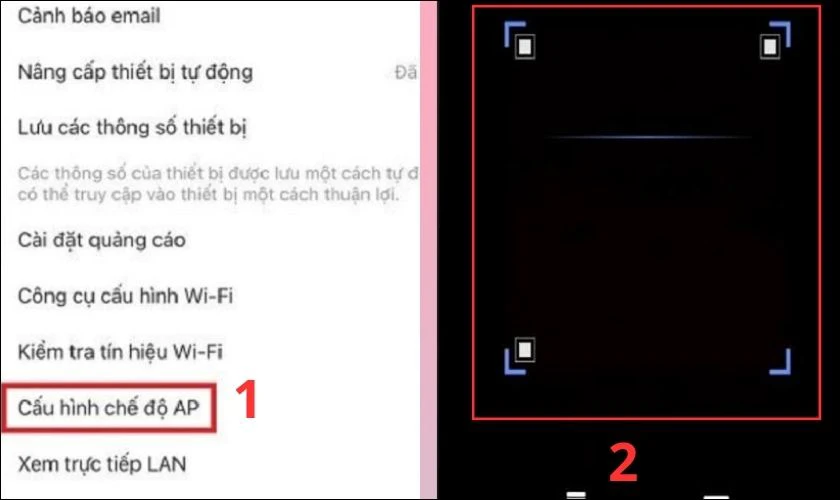
Bước 1: Tại giao diện chính của ứng dụng Ezviz, bạn chọn vào biểu tượng hình người. Tiếp đến bạn bấm chọn vào Cài đặt chung.
Bước 2: Bạn hãy chọn tiếp vào Cấu hình chế độ AP. Sau đó quét mã QR dưới đáy camera.
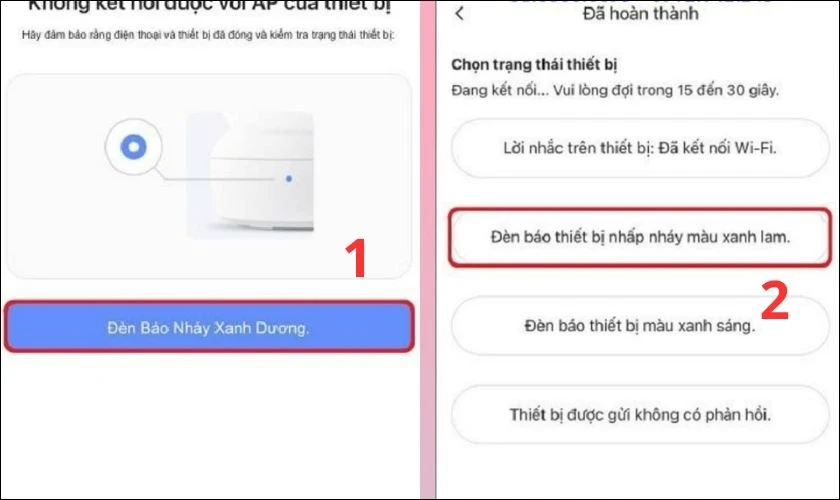
Bước 3: Bạn giữ nút nguồn trên camera một lúc để khởi động lại thiết bị. Sau đó bạn nhấn Kế tiếp. Bạn chọn vào Đèn Báo Nhấp Nháy Xanh Dương rồi nhấn Kế tiếp một lần nữa.
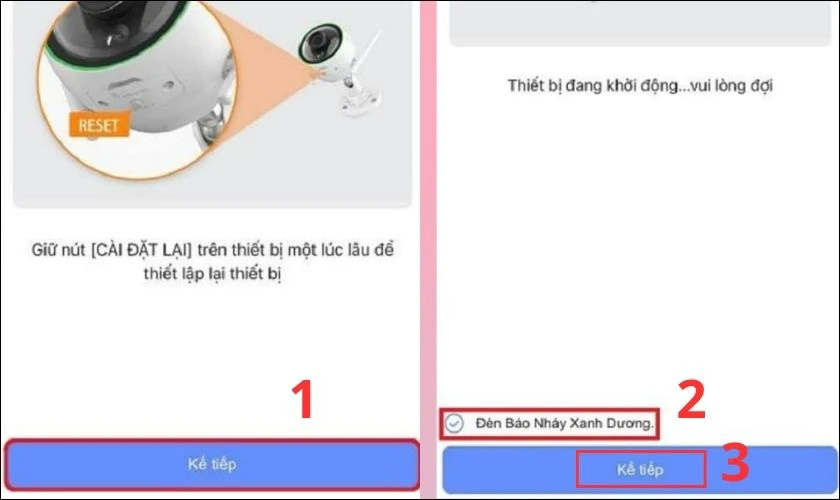
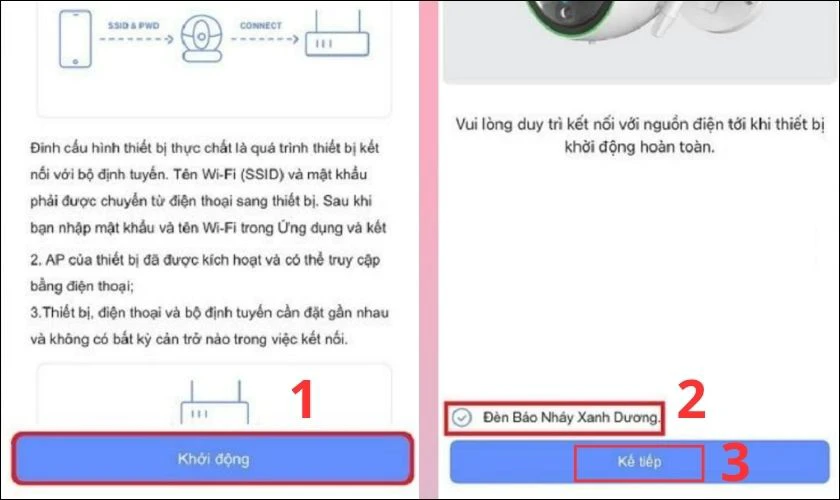
Bước 4: Bạn nhấn chọn Khởi động. Sau đó, chọn vào Đèn Báo Nhấp Nháy Xanh Dương rồi nhấn Kế tiếp một lần nữa.
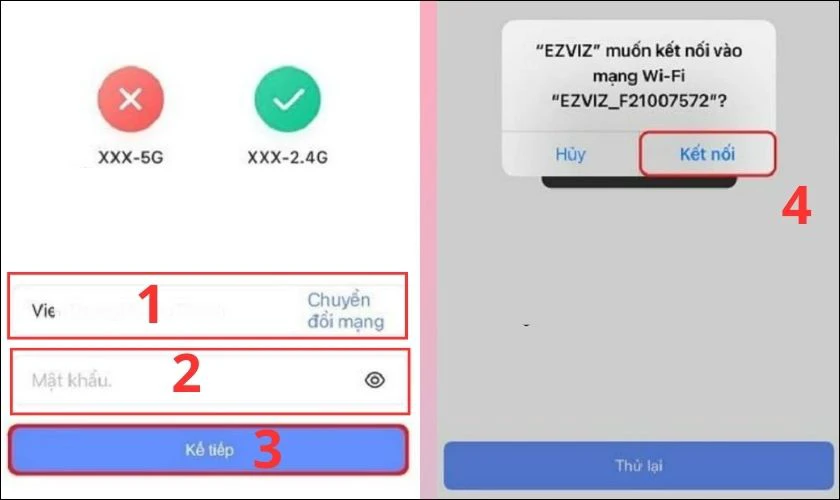
Bước 5: Ở bước này bạn hãy chọn Wi-Fi mà bạn muốn kết nối. Sau đó nhập mật khẩu rồi chọn Kế tiếp. Tiếp theo bạn chọn Kết nối.
Bước 6: Bạn chọn vào Đèn Báo nhấp Nháy Xanh Dương. Sau đó chọn Đèn báo thiết bị nhấp nháy màu xanh lam.
Vậy là bạn đã hoàn tất quá trình cách cài đặt lại Camera Ezviz khi đổi WiFi rồi đấy.
Cách kết nối Camera IP Ezviz với máy tính
Cách kết nối Camera IP Ezviz với máy tính cũng được thực hiện rất dễ dàng. Vì màn hình máy tính có diện tích lớn hơn điện thoại. Việc kết nối camera với máy tính sẽ giúp người dùng dễ quan sát và thao tác hơn.
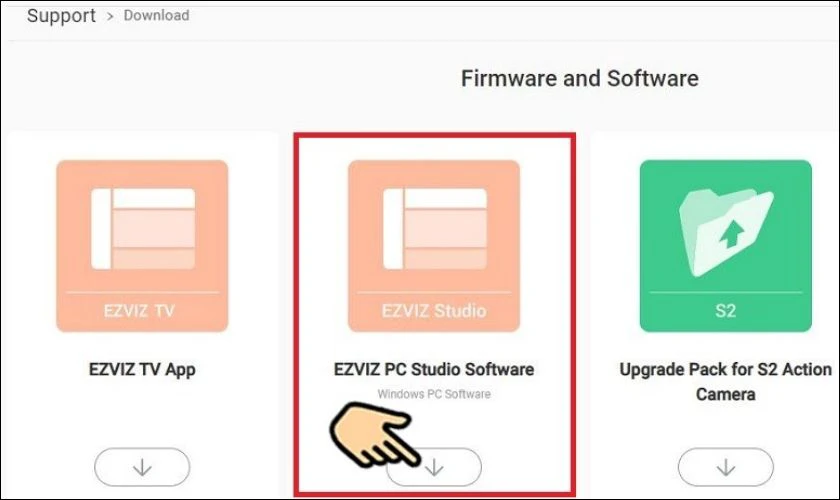
Bước 1: Đầu tiên bạn vào link support.ezvizlife.com. Sau đó, chọn Ezviz PC Studio Software để tải phần mềm về máy. Khi tải xong bạn tiến hành giải nén và cài đặt ứng dụng cho máy tính.
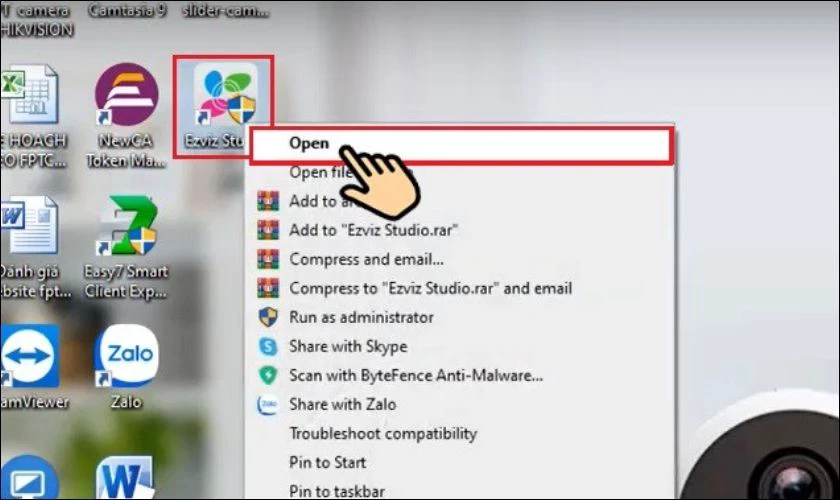
Bước 2: Tiếp đến bạn chọn Open để mở ứng dụng lên.
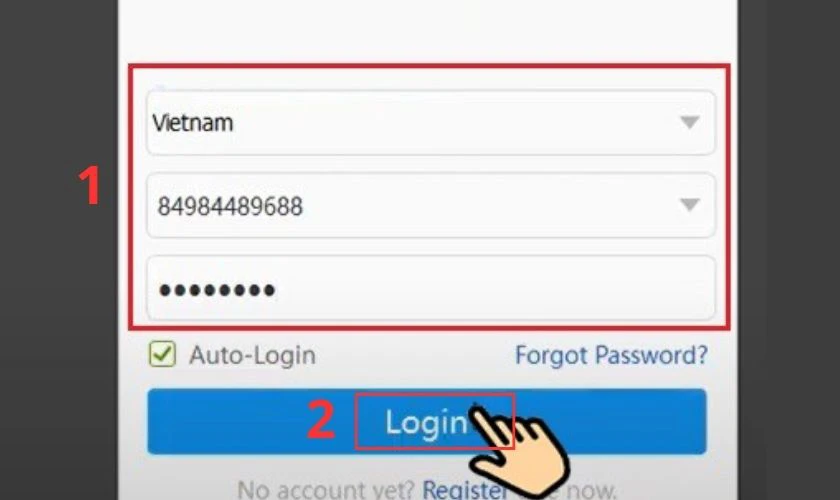
Bước 3: Bạn chọn Vietnam, nhập số điện thoại và mật khẩu rồi bấm Login.
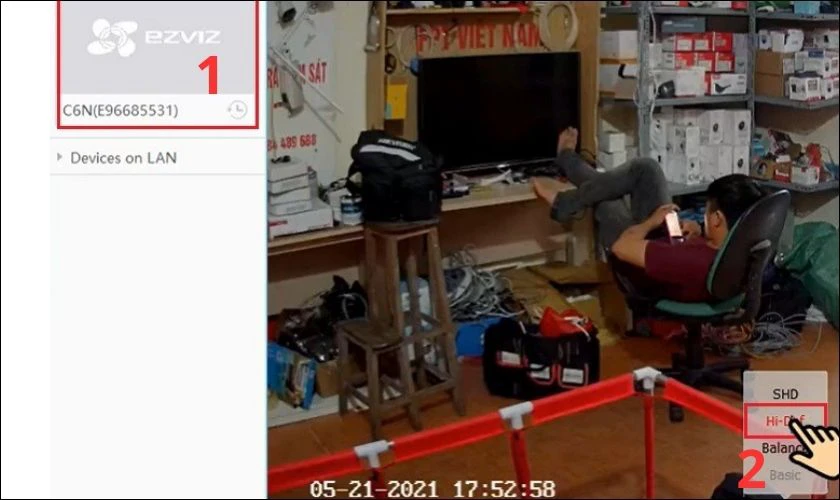
Bước 4: Sau đó bạn chọn vào camera bạn muốn thiết lập cấu hình. Bạn có thể chọn vào 1 trong các khung bên góc phải màn hình.
- SHD: Đây là chế độ hiển thị hình ảnh sắc nét nhất. Tuy nhiên để dùng chế độ này thì bạn phải dùng mạng có tốc độ mạnh.
- Hi-Def: Đây là chế độ có độ nét khá cao.
- Balance: Chế độ có độ nét cân bằng
- Basic: Đây là chế độ có độ nét khá thấp. Đối với những ai dùng mạng có tốc độ không ổn định thì nên chọn chế độ này.
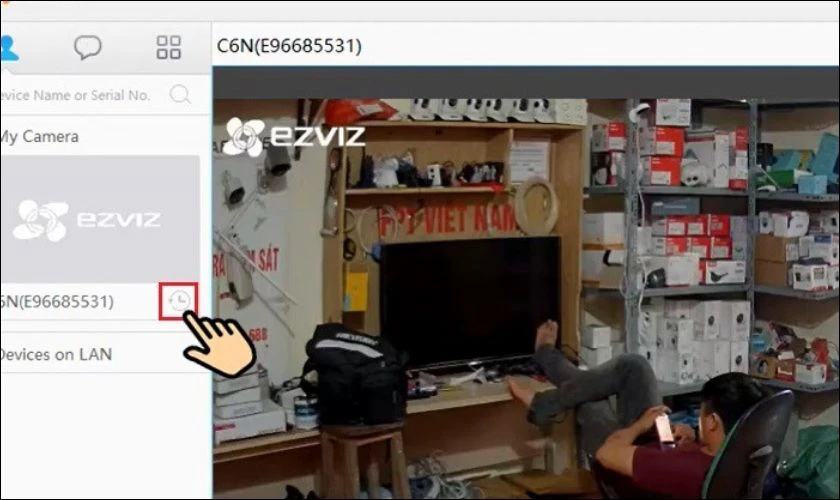
Bước 5: Nếu muốn xem lại đoạn camera đã được ghi hình, bạn hãy chọn vào biểu tượng đồng hồ.
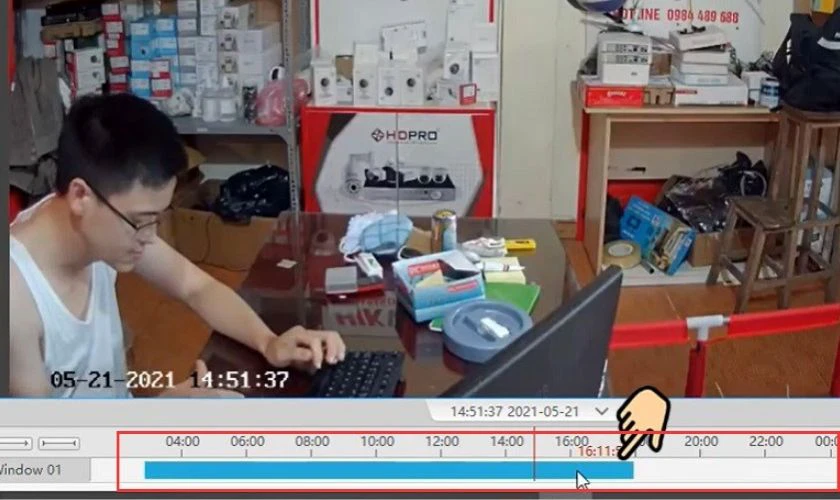
Bước 6: Tại thanh timeline màu xanh, bạn có thể chọn vào bất kỳ thời gian nào để xem lại video đã ghi hình.
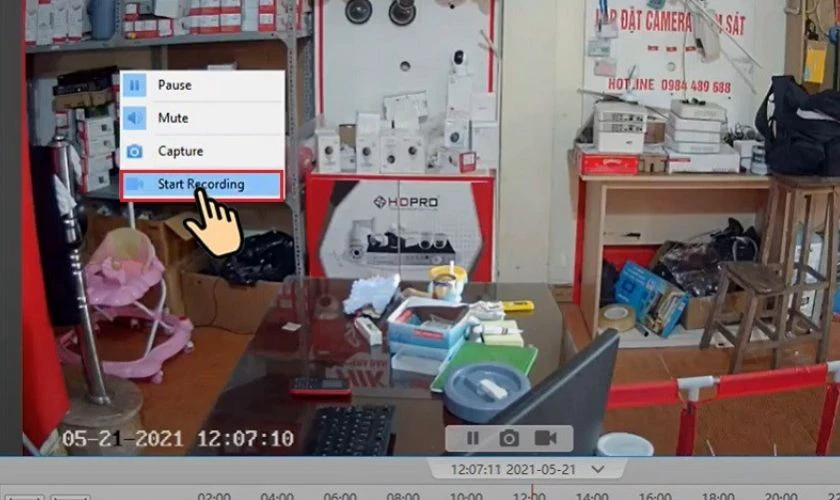
Bước 7: Nếu bạn muốn quay video màn hình thì hãy nhấn chuột phải rồi chọn Start Recording.
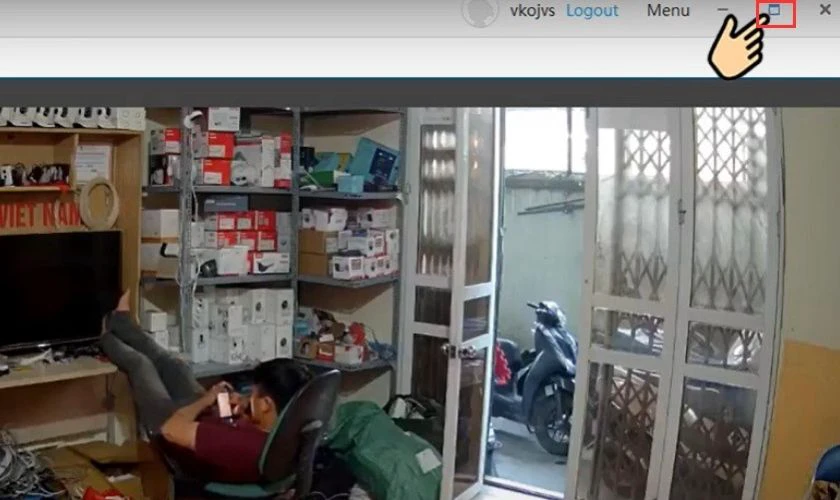
Bước 8: Để mở to khung camera quay hình. Bạn chỉ cần chọn vào ô hình vuông ở phía trên góc phải màn hình.
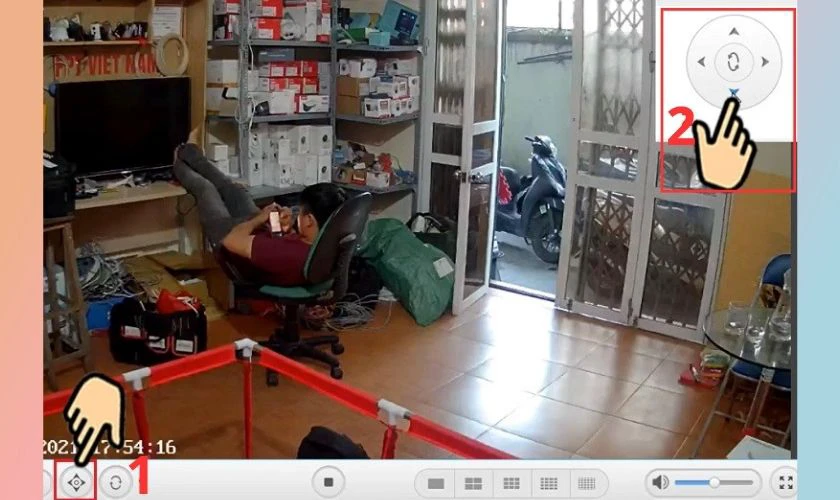
Bước 9: Nếu bạn muốn xem các góc khác của khu vực. Bạn hãy chọn vào biểu tượng điều khiển. Sau đó có thể nhấn vào các dấu mũi tên phải, trái, trên, dưới để điều chỉnh góc quay của camera.
Trên đây là hướng dẫn cách kết nối Camera Ezviz với máy tính cũng như cách thiết lập cơ bản. Bạn có thể tham khảo và thực hiện theo hướng dẫn bên trên nhé.
Ngoài camera Ezviz ra thì người dùng cũng rất ưu chuộng dòng camera IMOU. Xem ngay hướng dẫn chi tiết cách cài đặt camera IMOU trên điện thoại iPhone, Samsung, Oppo ,... và trên nhiều thiết bị khác.
Cách sử dụng các tính năng của Camera Ezviz
Sau khi làm theo cách cài lại Camera Ezviz. Để sử dụng hiệu quả Camera Ezviz, bạn hãy tìm hiểu rõ các tính năng của camera này. Dưới đây là một số tính năng đặc trưng của Camera Ezviz.
Giao diện sau khi thực hiện cách cài đặt Camera Ezviz
Giao diện ứng dụng camera Ezviz có thiết kế đơn giản. Do đó những ai mới sử dụng lần đầu cũng có thể làm quen và thao tác dễ dàng. Để biết chi tiết hơn về chức năng các phím trên màn hình chính của ứng dụng. Hãy theo dõi nội dung bên dưới nhé.
Tùy chọn các phím chức năng
Dưới đây là một số phím chức năng cơ bản trên ứng dụng Camera Ezviz. Bạn hãy xem qua để dễ dàng thao tác thiết lập camera Ezviz trên ứng dụng.
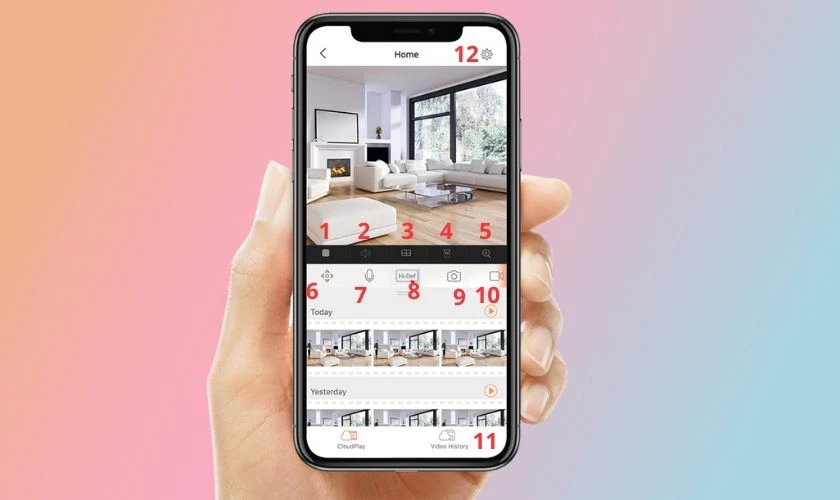
- (1) Biểu tượng hình vuông: Camera sẽ tạm dừng ghi hình.
- (2) Biểu tượng loa: Điều chỉnh tắt hoặc bật âm thanh khi quan sát.
- (3) Hình chữ nhật có 4 ô vuông: Đây là chế độ xem cùng lúc nhiều camera.
- (4) Biểu tượng lật hình: Bạn có thể lật khung hình tùy ý muốn.
- (5) Biểu tượng kính lúp: Chế độ phóng to xem toàn khung hình.
- (6): Biểu tượng điều khiển: Xoay camera theo hướng trái, phải, lên, xuống.
- (7) Biểu tượng Micro: Khi bạn nói chuyện thì người ở khu vực lắp camera có thể nghe được.
- (8) Hi-Def: Bấm vào đây bạn có thể cài đặt độ nét khi ghi hình. Có 3 chế độ bao gồm: Chế độ chuẩn, chế độ Hi-De và chế độ độ nét cực cao.
- (9) Biểu tượng camera: Chụp màn hình, sau khi chụp xong hình sẽ tự động lưu về máy.
- (10) Biểu tượng máy quay: Nhấn 1 lần sẽ quay màn hình. Nhắn 1 lần nữa sẽ tắt chế độ quay màn hình. Đoạn clip khi quay xong sẽ lưu thẳng về máy.
- (11) Biểu tượng thẻ nhớ: Xem lại video đã được camera ghi hình.
- (12) Biểu tượng cài đặt: Thiết lập thông số của camera.
Cách kết nối camera Ezviz với nhiều điện thoại
Việc chia sẻ camera Ezviz với nhiều điện thoại được rất nhiều người thực hiện. Đặc biệt là trong các trường mẫu giáo. Thông qua việc chia sẻ camera, phụ huynh sẽ quan sát được quá trình học của con ở trường. Để thực hiện cách kết nối camera Ezviz với nhiều điện thoại. Bạn hãy thực hiện như sau:
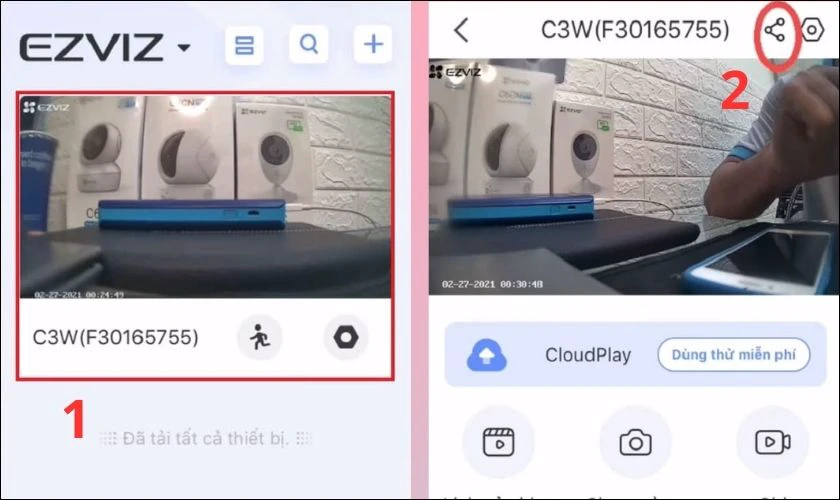
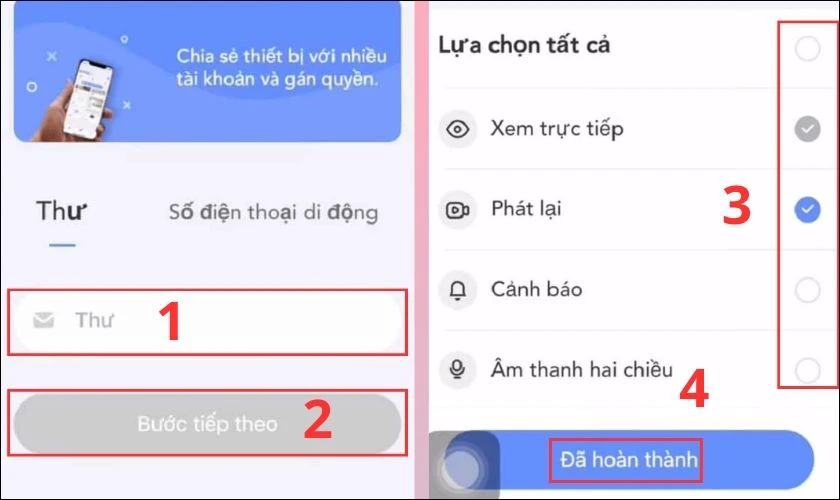
Bước 1: Đầu tiên bạn hãy chọn vào camera mà bạn cần chia sẻ. Sau đó bạn nhấn vào biểu tượng chia sẻ bên góc phải phía trên màn hình.
Bước 2: Tại đây bạn có thể chia sẻ camera với người khác thông qua số điện thoại hoặc địa chỉ Gmail. Khi đã nhập xong thông tin, bạn chọn vào Bước tiếp theo. Sau đó bạn tiến hành phân quyền cho người bạn muốn chia sẻ camera. Bạn có thể chọn 1 trong số đó hoặc chọn tất cả. Khi chọn xong bạn nhấn Đã hoàn thành.
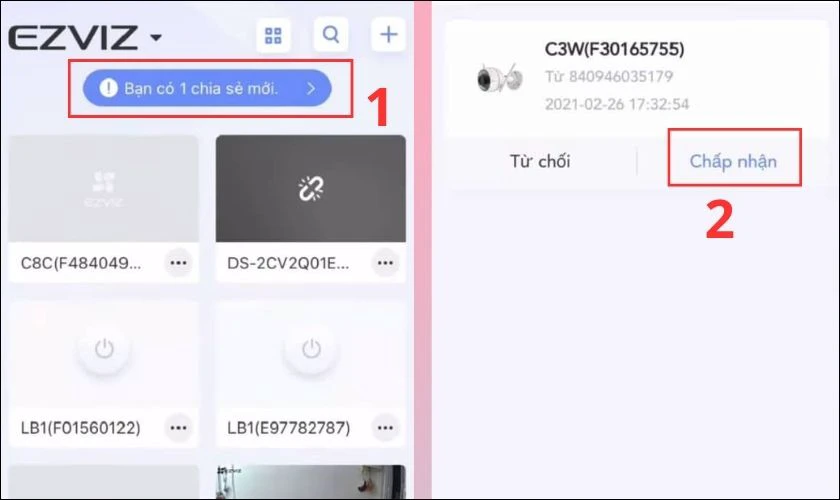
Bước 3: Lúc này người được chia sẻ camera sẽ nhận được lời mờ. Bạn hãy chọn vào Bạn có 1 chia sẻ mới. Sau đó bạn hãy chọn vào Chấp nhận.
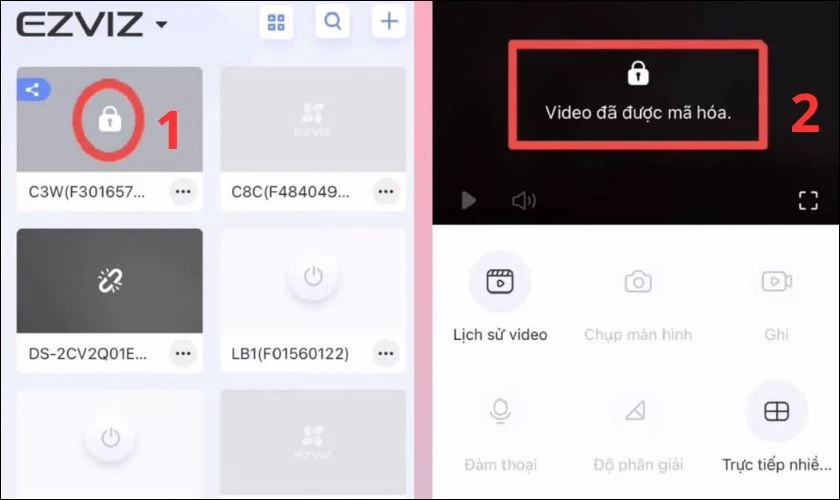
Bước 4: Lúc này màn hình camera vẫn sẽ bị khóa. Bạn chọn vào biểu tượng ổ khóa. Sau đó bạn chọn vào biểu tượng ổ khóa một lần nữa.
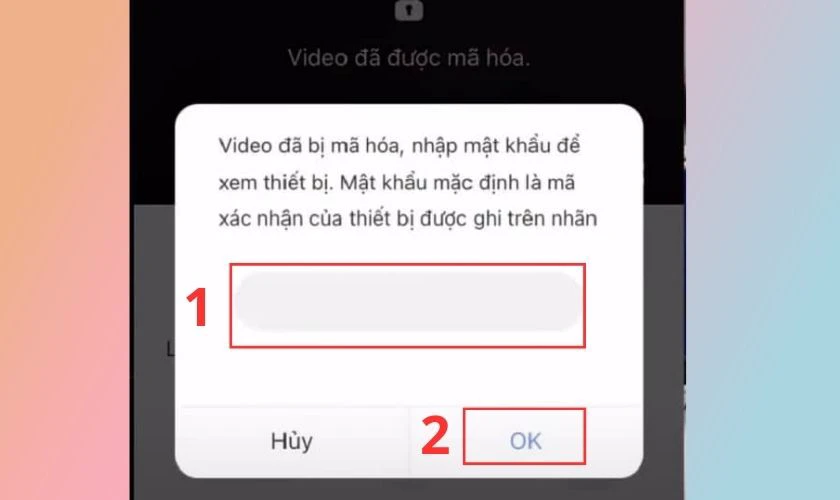
Bước 5: Lúc này bạn cần nhập mật khẩu có chứa 6 ký tự viết hoa vào ô được khoanh trong hình. Bạn hãy nhờ người chia sẻ cung cấp mật khẩu camera cho bạn. Nếu không bạn sẽ không thể truy cập vào camera.
Vậy là với 5 bước trên, bạn đã có thể chia sẻ quyền truy cập camera Ezviz với nhiều điện thoại khác rồi đấy.
Kết luận
Cách cài đặt Camera Ezviz được thực hiện chi tiết và vô cùng đơn giản. Do đó chắc chắn bạn sẽ thực hiện cài đặt thành công cho camera Ezviz khi tham khảo bài viết này. Còn nếu có bất kỳ thắc mắc gì về chức năng cũng như thiết lập camera. Hãy mạnh dạng comment để được hướng dẫn nhé.
